

How To Paint A Light Fixture
Updated 2019
Nosotros but swapped out ii onetime fluorescent low-cal fixtures in our kitchen and they each required slightly different techniques because – surprise! – 1 of the didn't have a fixture box in the ceiling backside it. Yep, just wires coming out of the drywall! And then nosotros'll show you two ways to supercede your fluorescent lighting with a more udpated pendant or affluent mountain fixture.
Removing A Large Fluorescent Light Fixture
First we replaced the large fluorescent low-cal near our stove. It was incredibly elementary to do so we've outlined a pace-by-step process below:
Step ane: Turn Off The Power
Whenever you're working with a light fixture, it's always practiced to plough off the ability to this low-cal at the circuit billow in your electrical panel box, non just at the light switch. Doing this will make sure someone doesn't flip the switch back on while yous're working. And doing information technology showtime makes sure you don't forget almost information technology later. If you want to be super, extra careful, you can also use a voltage dector to brand sure at that place's no current running to any wires earlier you brand contact with them.
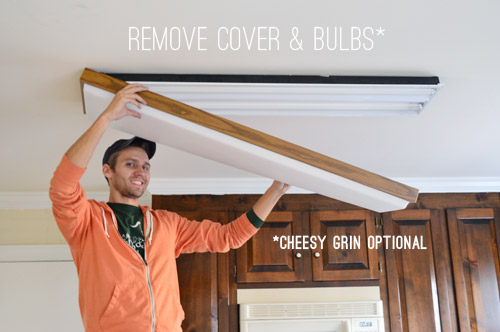
Step 2: Remove the Plastic Shade & Lite Bulbs
Side by side, I took off the plastic shade encompass, which was just snapped into identify. Then I took out the long fluorescent bulbs and placed them aside, simply to make certain the fluorescent tubes didn't get broken in the process.
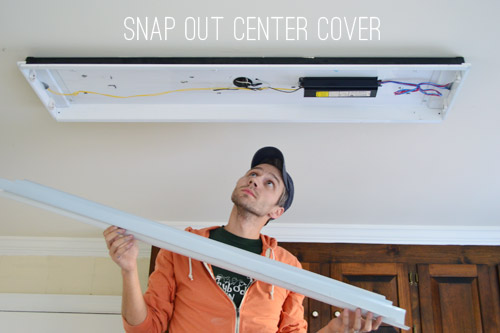
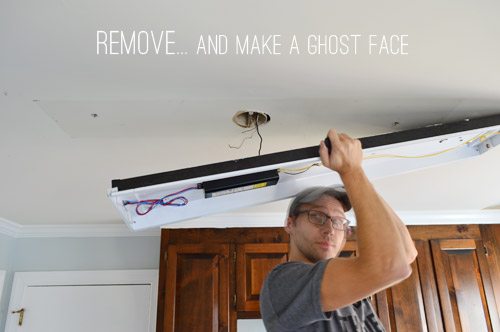
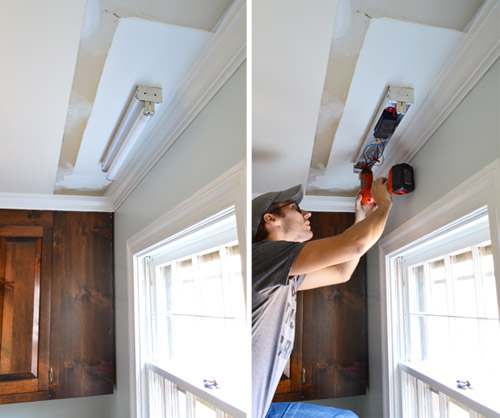
Step 3: Detach The Metal Panel
Then we snapped out the metal cover that curtained all of the wiring in the back of the fluorescent fixture. We were very relieved to encounter that the wiring came through the eye of the fixture. In our concluding kitchen, the wires came through the ceiling at one end of the fluorescent calorie-free. Had that been the instance here, it would've required more than complex wiring to motility the fixture box to the right spot.
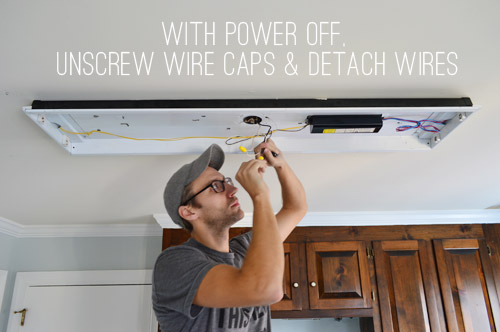
Step four: Disconnect Wires In The Onetime Fixture
So, with the ability still turned off, I unscrewed the wire caps so that nosotros could disassemble the fixture wiring from the ceiling wiring. You don't need to mess with any of the wiring within the fixture itself (aka, those blue and red wires on the right side of the photo below). Likewise, you tin see this step was actually done later on we painted the walls.
Stride 5: Unscrew The Fixture Box & Remove It From Your Ceiling
Now the merely matter holding upward the fluorescent fixture were two big screws on either end. In one case I unscrewed those with my cordless screwdriver…

…I could finally remove information technology entirely. Evidently I was so excited to take it gone, I blurred my confront.
If you're quondam fixture is in good enough condition still, we highly recommend donating it somewhere like a Habitat for Humanity Restore.
Step 6: Spackle Holes & Paint The Area
Since your new light fixture probable won't cover the same spot, yous'll need to spackle whatever holes (like the ones from the screws), repair any other subconscious damage, and also paint to blend the area with the rest of your ceiling. You'll see u.s. get to that subsequently in this post, but this is an important step to make sure there'due south no lingering evidence of your old fluorescent fixture!
Installing A Pendant Calorie-free Fixture In Its Place
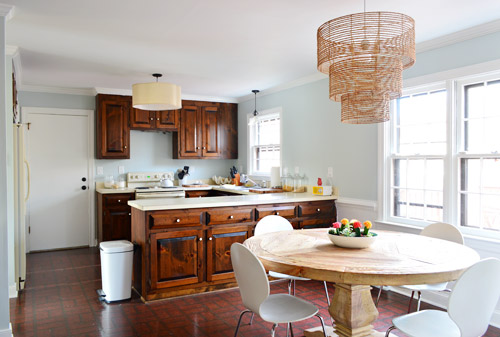
With your fluorescent fixture gone, now y'all tin turn your attention to installing your new pendant, semi-flush, or flushmount light. Nosotros planned to install a burlap quatrefoil shade from our local Decorating Outlet that nosotros mentioned here, which is hung from the dual-bulb pendant beneath.
Annotation: If y'all're not comfortable with this pace, you can e'er hire an electrician (and too pat yourself on the dorsum for saving the toll of removing the old fluorescent puppy). But if y'all fabricated it this far, it'south pretty straightforward to finish the chore yourself.
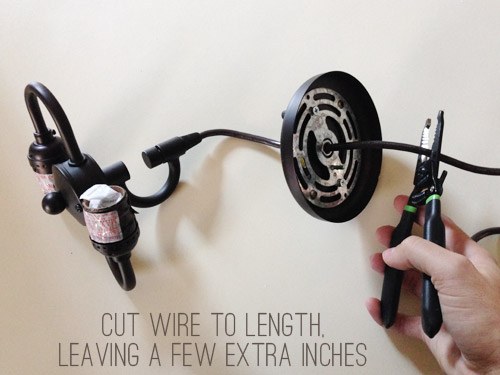
Step ane: Trim Whatsoever Excess Wire
Nosotros wanted it to sit nearly affluent to the ceiling so we had to cut off a lot of excess wire earlier hanging information technology. This can exist washed to shorten any pendant fixture, or even to catechumen a plug-in calorie-free to a difficult-wired ane.
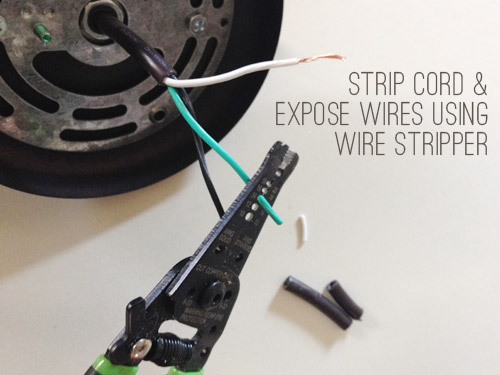
Pace 2: Use Wire Strippers On The Cord To Expose Wires
Side by side, I used wire strippers to expose the tip of each individual wire, creating a place for them to connect to the wires in the ceiling. This wire stripper I bought a while back (similar to this one) has been a great purchase, in case you're planning to hang whatever light fixtures presently.
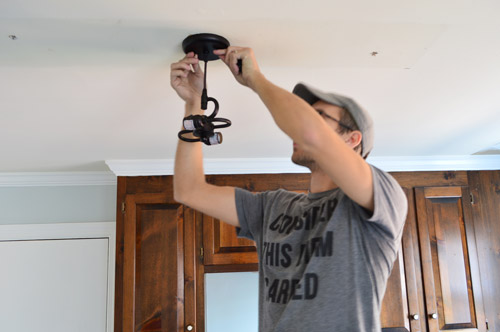
Pace 3: Install Your New Fixture
With my string shortened and my wires ready, I could complete the installation per usual. Start I fastened the mounting bracket to the ceiling fixture box and then connecting the matching wires together with wire caps. Once those were secured, I tightening on the ceiling cover with the two small screws that came with it.
Hither's our new pendant in one case the shade was installed – and later we'd painted and patched the ceiling too (find how the holes and discoloration are gone from the photo to a higher place?).

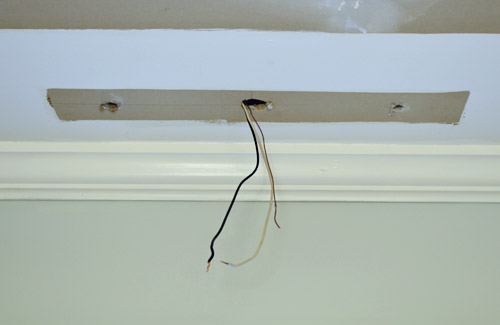
With that projection completed, nosotros turned our attention to the smaller fluorescent light above our kitchen sink. Information technology had been subconscious backside the cabinetry on that side, but now that we removed it (in favor of some open shelving that we can't expect to add) – well, it's super visible. So we repeated some of the same steps to a higher place, although this one didn't fifty-fifty take a plastic embrace to remove first.
While information technology was a relief that the wires were centered over the window (again, this wasn't the case in our last kitchen) information technology was kind of a bummer to take downward the sometime light and detect that in that location was no fixture box in the ceiling. Just a large hole where the wires poked out.
Installing An "Old Work" Ceiling Box
We'd need a fixture box to install the new glass funnel pendant that nosotros'd planned for the space. I felt effectually almost the wires to meet if there was a axle that I could attach a fixture box to, simply came up with nothing. So information technology meant installing one of these "old work" ceiling boxes. They're designed to slide into existing walls or ceilings, where as "new work" boxes are attached to studs or joists before drywall is installed. Since nosotros didn't have a stud nearby, this onetime work box would but be held tightly to the drywall past three little wings on the side (come across below). Once you've placed the box in your drywall, y'all tighten the screws on the face of the box which swing the wings out and pulls them frontwards – somewhen striking the back of the drywall and pinching the box in place.
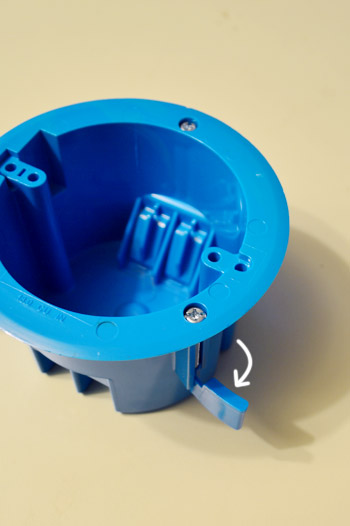
My research revealed that these aren't technically meant to support light fixtures (something that nails or screws into the frame of the house is recommended), just plenty of reviewers on the Home Depot site reported using them to hang lightweight fixtures like ours, so we felt comfy giving information technology a effort. Update: Information technology held in identify with no trouble for a couple of years, at which signal we finally remodeled the unabridged kitchen and replaced with with a recessed lite.
Step 1: Brand Certain Your Power Is Off!
If y'all hadn't already turned off the circuit breaker at your electrical console box, make sure yous do information technology before you continue.
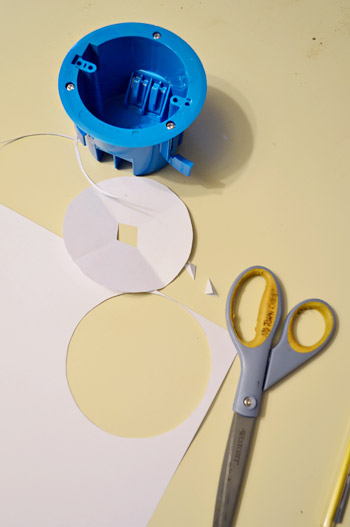
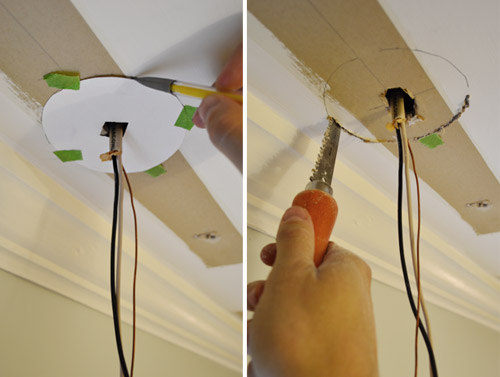
Stride 2: Mark The Placement Of Your New Fixture Box
To install the box I first had to cut a hole for information technology in the ceiling. Information technology had come with a template, only somewhere betwixt checkout and home we lost the sheet. So Sherry made me one of my ain – making certain it was a little scrap smaller than the largest part of the box (since that'south a lip that needs to rest on the drywall).
Step iii: Cutting Your New Hole
Next I traced that template onto the ceiling, making certain that my wires were coming out through the eye. The I cut the hole out using a drywall jab saw. I kinda felt similar I was in the middle of an old school cartoon where one grapheme cuts the flooring out from underneath another.
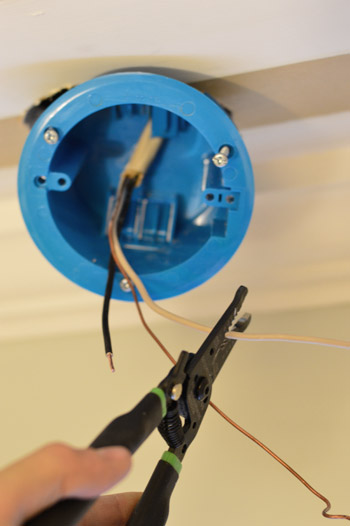
Step 4: Feed The Wires Through The Box
With my hole cut, I could feed my wires through the back of the box and trim them to size (they had been surprisingly long!). Again, make sure the power is off before doing this.
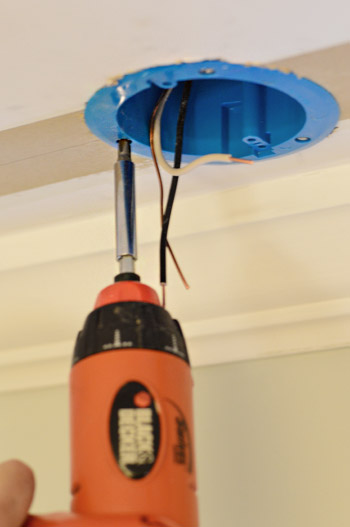
Pace 5: Tighten The Screws To Secure The Box
Then I tightened the screws on the face of the box with a screwdriver to secure information technology in place with those wings.
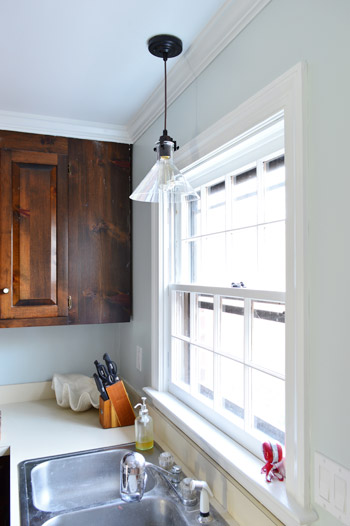
Step half dozen: Install Your Lightweight Fixture
From at that place, the actual fixture install itself was straightforward (connect the right wires, secure the canopy, turn on the ability, and watch it glow). We similar that it's simple and doesn't command too much attention visually (since the other two lights in the room exercise) and that the view out the window isn't obscured by a large heavy shade.
UPDATE! We've finally transitioned our entire business firm to LED light bulbs (they save tons of energy & money, and they're a lazy person's best friend because you never accept to change them). For anyone wondering, these are our favorite interior LED light bulbs. Their glow is warm & natural (not weird/blue similar some of the others we've tried) and they employ around ninety% less energy.
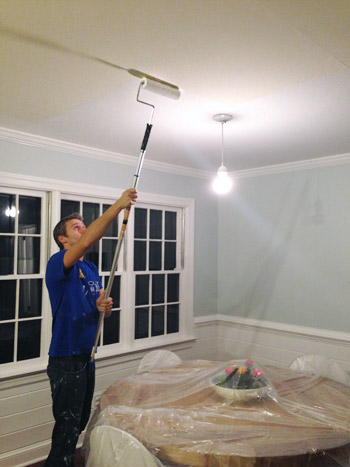
With the fluorescent fixtures finally gone, we could finally intermission out the primer and pigment to make the ceiling expect new again. We but primed the areas that were raw drywall, then nosotros painted the whole thing in Just White (same colour as the trim) in a flat end. As is our usual MO, Sherry did all the cutting in around the crown molding, and I was the resident roller man.
The difference of the painted ceiling is somewhat subtle in pictures, but in existent life it makes the whole room expect a lot fresher (the glossy white painted crown next to the old yellowed ceiling was no bueno in person, so we're glad that's gone for adept). Oh and the two larger fixtures are sporting different colored cords at the moment, simply we might spray the white one ORB like we did with this pendant in our previous kitchen if it bothers us after we pigment the cabinets. We by and large like an oil-rubbed-bronze string for some visual dissimilarity, just in this case nosotros appreciate how the white 1 becomes kind of invisible over the dining area, then we'll have to keep you posted if we alter annihilation as the room comes together more.
It's nice to have three more items checked off the list, but it means we're dangerously close to the job that we're simultaneously psyched most and dreading: painting the cabinets. Merely man oh man, what a departure that will brand (especially when they await like this upwardly close).
-
Remove wallpaper -
Move fridge chiffonier forward -
Remove upper cabinets on window wall to prep for open up shelves -
Reinstall crown molding(yous can read virtually how we did those kickoff four things hither) -
Prime number & paint the pantry and the door to the garage -
Prime number & pigment the trim, crown molding, & baseboards -
Prime & paint the paneling(y'all can read near how nosotros did those last iii things here) -
Prime and paint the walls -
Remove the existing microwave (craigslist information technology?) and get a countertop one we can eventually install in the pantry(here's the post on those last two bullets)
- Install a cheap range hood (we constitute one for $25 on craigslist that nosotros can't wait to hang) to lighten up that wall
-
Patch, prime number, and pigment the ceiling -
Replace the florescent light in the cooking area and the pendant over the sink -
Replace and heart the light over the dining table - Hang floating shelves on the window wall
- Pigment the cabinets (you can run into the colors we're leaning towards hither)
- Update the onetime cabinet hinges and knobs
- Go a rug for consume-in expanse? Perhaps install pare and stick tiles everywhere?
- Defunction for windows?
Has anyone else checked off a few things on their to-practice list? Nosotros know it was an interesting conditions calendar week for lots of you lot, so maybe yous were able to reach your "drink hot cocoa" and "get sledding" to-dos? We'd be a bit jealous of that, considering that all that we got was water ice and freezing rain.
Update – Wanna know where we got something in our house or what paint colors we used? Simply click on this button:

*This post contains an chapter link

Source: https://www.younghouselove.com/lights-ceiling-action/
Posted by: martintiquitim.blogspot.com
0 Response to "How To Paint A Light Fixture"
Post a Comment